Android 中的跨进程通信 IPC 主要有以下几种方式:
- BroadcastReceiver
- ContentProvider
- AIDL
- Messenger
- Socket
- 文件
Linux 已经提供了管道、消息队列、共享内存和 Socket 等 IPC 机制
进程是资源分配的基本单位,线程是调度的基本单位。
一些基础知识
以下内容来自:
作者:SylvanasSun 链接:https://juejin.im/post/59f8691b51882534af254317 来源:掘金 著作权归作者所有。商业转载请联系作者获得授权,非商业转载请注明出处。
Linux 为每个进程维护了一个单独的虚拟地址空间。虚拟地址空间分为内核空间与用户空间,用户空间包括代码、数据、堆、共享库以及栈,内核空间包括内核中的代码和数据结构,内核空间的某些区域被映射到所有进程共享的物理页面。Linux 也将一组连续的虚拟页面(大小等于内存总量)映射到相应的一组连续的物理页面,这种做法为内核提供了一种便利的方法来访问物理内存中任何特定的位置。
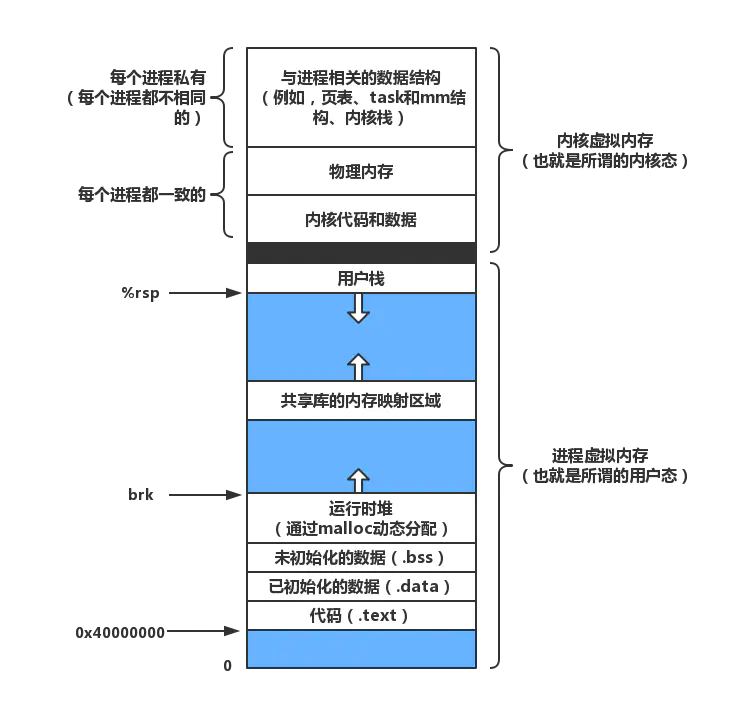
Linux 通过将一个虚拟内存区域与一个硬盘上的文件关联起来,以初始化这个虚拟内存区域的内容,这个过程称为内存映射(memory mapping)。这种将虚拟内存系统集成到文件系统的方法可以简单而高效地把程序和数据加载到内存中。
普通文件映射就是将一个文件与一块内存建立起映射关系,对该文件进行 IO 操作可以绕过内核直接在用户态完成(用户态在该虚拟地址区域读写就相当于读写这个文件)。匿名文件映射一般在用户空间需要分配一段内存来存放数据时,由内核创建匿名文件并与内存进行映射,之后用户态就可以通过操作这段虚拟地址来操作内存了。匿名文件映射最熟悉的应用场景就是动态内存分配(malloc() 函数)。
内存映射提供了共享对象的机制,来避免内存资源的浪费。一个对象被映射到虚拟内存的一个区域,要么是作为共享对象,要么是作为私有对象的。 进程对共享对象的写操作对于其他也使用到该共享对象的进程是可见的。
CPU 获取到虚拟地址,然后通过 MMU(内存管理单元)将其翻译为物理地址。
linux IPC
优缺点参考:
- 管道:在创建时分配一个 page 大小的内存,缓存区大小比较有限;
- 消息队列:信息复制两次,额外的 CPU 消耗;不合适频繁或信息量大的通信;
- 共享内存:无须复制,共享缓冲区直接付附加到进程虚拟地址空间,速度快;但进程间的同步问题操作系统无法实现,必须各进程利用同步工具解决;
- 套接字:作为更通用的接口,传输效率低,主要用于不通机器或跨网络的通信;
- 信号量:常作为一种锁机制,防止某进程正在访问共享资源时,其他进程也访问该资源。因此,主要作为进程间以及同一进程内不同线程之间的同步手段。
- 信号:不适用于信息交换,更适用于进程中断控制,比如非法内存访问,杀死某个进程等;
作者:Gityuan 链接:https://www.zhihu.com/question/39440766/answer/89210950
- 管道 Pipe
管道 是将标准输入输出连接起来的进程。 数据复制 2 次,有长度限制
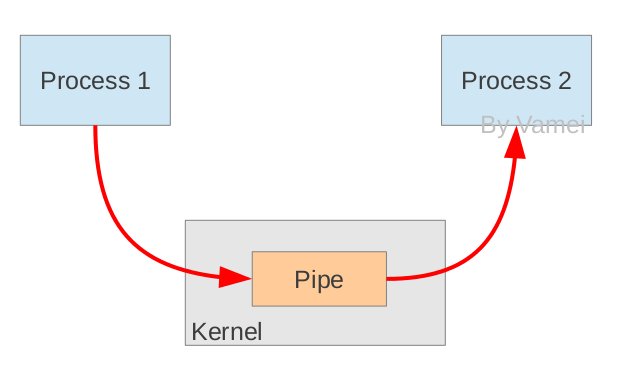
如图,进程 1 将数据写入到管道(内存缓存区),进程 2 从管道中读取数据。数据从写端流入管道,从读端流出,这样就实现了进程间通信
每个进程的输出被当做下一个进程的输入。
ls -l | less //将ls -l 的结果输入到less中,实现分页
Linux 进程间通信之管道 (pipe)、命名管道 (FIFO) 与信号 (Signal) https://blog.csdn.net/skyroben/article/details/71513385
- 消息队列 Message
是一串可以有不同类型的消息块的链表,可以避免阻塞。数据复制 2 次,有长度限制,缓冲小。
https://www.ibm.com/developerworks/cn/linux/l-ipc/part3/index.html
- 共享内存
多个进程可以访问一个公用的内存空间。效率最高的 IPC。数据内存复制 0 次,但是没有同步互斥机制
- 套接字 Socket
传输效率低,数据复制 2 次
- 信号量 semaphore
与管道不同,信号量是为了保护进程共享资源在同一时刻只能被一个进程访问。解决同步和互斥问题。
sv:信号变量
对信号量的操作只有一下 P(sv) 和 V(sv) 两个原子操作:
- 进程 1 访问资源时对信号量进行等待操作 P(sv)(如果 sv>0 则操作资源并将信号量 -1,否则挂起进程等待);
- 当该进程 1 对资源执行完操作后,对信号量进行发送操作 V(sv)(此时如果有进程 2 等待 sv 而挂起,则恢复进程 2,否则就给 sv+1)
https://blog.csdn.net/skyroben/article/details/72513985
- 信号 Signal
信号是进程间通信中唯一的异步通信机制,通知接收信号的进程发生了什么事情。而进程接受到信号后可以忽略,捕获处理,或者使用系统默认操作。
https://www.ibm.com/developerworks/cn/linux/l-ipc/part2/index1.html
只能承载很小的信息量,主要用在进程的中断控制
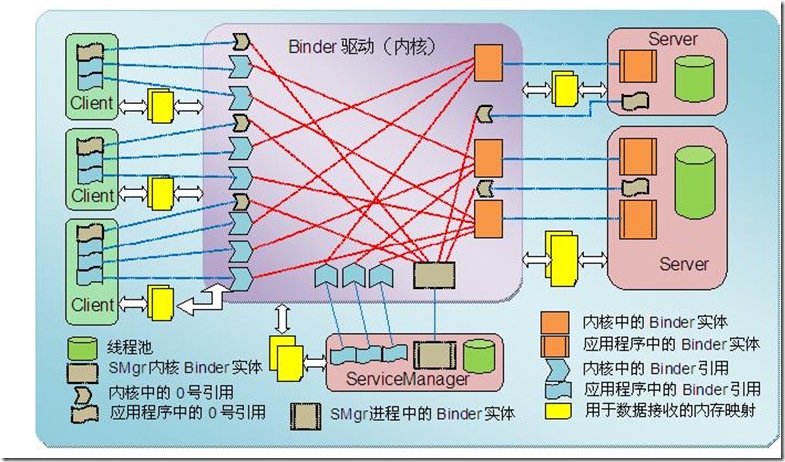
Binder
数据拷贝 1 次,有权限校验(为发送方添加了 UID/PID 身份)
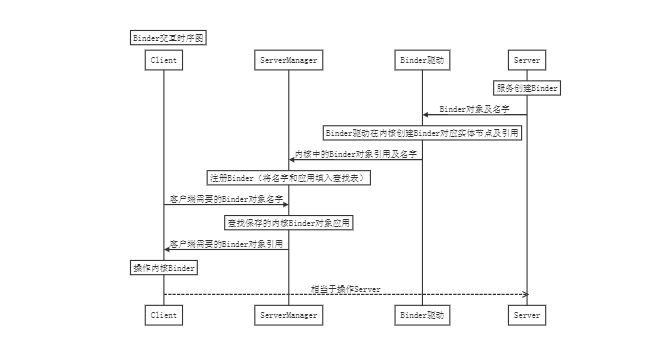
时序图:
title:  Binder交互时序图

participant Client
participant ServerManager
participant Binder驱动
participant Server

note over Server: 服务创建Binder
Server-> Binder驱动: Binder对象及名字
note over Binder驱动: Binder驱动在内核创建Binder对应实体节点及引用
Binder驱动-> ServerManager: 内核中的Binder对象引用及名字
note over ServerManager: 注册Binder(将名字和应用填入查找表)
Client -> ServerManager: 客户端需要的Binder对象名字
note over ServerManager: 查找保存的内核Binder对象应用
ServerManager -> Client: 客户端需要的Binder对象引用
note over Client: 操作内核Binder
Client -->> Server:相当于操作Server
理论上的 Binder 逻辑:
SMgr 提供的 Binder 比较特殊,它没有名字也不需要注册,当一个进程使用 BINDER_SET_CONTEXT_MGR 命令将自己注册成 SMgr 时 Binder 驱动会自动为它创建 Binder 实体(这就是那只预先造好的鸡)。其次这个 Binder 的引用在所有 Client 中都固定为 0 而无须通过其它手段获得。
在数据从发送方向接收方拷贝时,驱动会根据发送数据包的大小,使用最佳匹配算法从缓存池中找到一块大小合适的空间,将数据从发送缓存区复制过来。
为了实现用户空间到用户空间的拷贝,Binder 驱动的 mmap() 分配的内存除了映射进了接收方进程里,还映射进了内核空间。所以调用 copy_from_user() 将数据拷贝进内核空间也相当于拷贝进了接收方的用户空间,这就是 Binder 只需一次拷贝的‘秘密’。
版权声明:本文为 CSDN 博主「universus」的原创文章,遵循 CC 4.0 BY-SA
版权协议,转载请附上原文出处链接及本声明。 原文链接:https://blog.csdn.net/universus/article/details/6211589
主要参考文章:https://blog.csdn.net/universus/article/details/6211589
https://blog.csdn.net/freekiteyu/article/details/70082302
Binder 通信主要涉及一下对象:
- Server
- Client
- ServerManager
- Binder 驱动
首先要知道,Server,Client 以及 ServerManager 一般都在不同的进程之中,那么 Server,Client 如何与 ServerManager 通信并注册/查询所需的服务呢?这里就需要用到0 号引用 Binder。
0 号引用 Binder 是 ServerManager 内部创建匿名 Binder,所有的 Client(相对于 ServerManager 来说其他和他交互的都是 Client)都默认持有这个 Binder 的引用。
所以一个完整的 AIDL 通信过程如下:
- Server 创建一个 Binder 和对应名字
- Server 通过持有的 0 号引用 Binder 和 ServerManager 通信。 将生成的 Binder 和对应名字发送到 Binder 驱动,Binder 驱动会为这个 Binder 在内核空间创建对应实体节点及其引用(复制了一次),并通过 0 号引用将其发给 ServerManager。
- ServerManager 收到内核中的 Binder 对象引用及名字后将其保存到查找表中。
- Client 通过 0 号引用 Binder 和 ServerManager 通信。 Client 将需要的 Binder 的名字发给 ServerManager,ServerManager 查询到已经注册的内核 Binder 引用并将其发给 Client。
- Client 获取到内核 Binder 的引用进行操作。
再来看看一个完整的流程:
在 Service 中,我们会先创建一个 mIBinder 对象并且在public IBinder onBind(Intent intent)方法返回。
private IBinder mIBinder = new AidlBinderInterface.Stub() {
...
    //这里实现我们服务能够提供的方法
}
追踪 onBind 方法,我们会发现mIBinder的对象会在 ActivityThread 中的private void handleBindService(BindServiceData data)方法中被传入到 IActivityManager 的 publishService 方法中。
private void handleBindService(BindServiceData data) {
    ...
    IBinder binder = s.onBind(data.intent);
    ActivityManager.getService().publishService(
                                data.token, data.intent, binder);
}
ActivityManager.getService() 方法是通过 IPC 获取到 ActivityManager 的引用
    /**
     * @hide
     */
    public static IActivityManager getService() {
        return IActivityManagerSingleton.get();
    }

    private static final Singleton<IActivityManager> IActivityManagerSingleton =
            new Singleton<IActivityManager>() {
                @Override
                protected IActivityManager create() {
                    final IBinder b = ServiceManager.getService(Context.ACTIVITY_SERVICE);
                    final IActivityManager am = IActivityManager.Stub.asInterface(b);
                    return am;
                }
            };
而根据这篇文章,这个 binder 最终会被传输到绑定这个服务时所用的 ServiceConnection 对象的onServiceConnected方法中(即 mIBinder 通过 ServerManager 从 Service 传递到了 Client):
private ServiceConnection mConnection = new ServiceConnection() {
        @Override
        public void onServiceConnected(ComponentName name, IBinder service) {
            mServiceInterface = AidlBinderInterface.Stub.asInterface(service);
            //我们通过得到的这个 mServiceInterface 可以在客户端调用服务所实现的方法
        }

        @Override
        public void onServiceDisconnected(ComponentName name) {

        }
    };
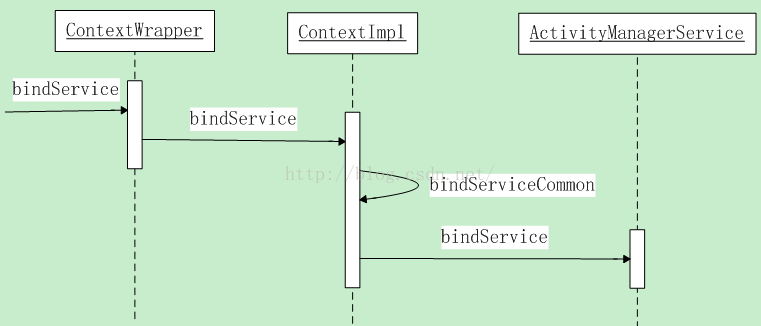
根据Android 服务之 bindService 源码分析mConnection 会通过context.bindService(intent, mConnection, Context.BIND_AUTO_CREATE);最终在 ActivityManagerService 通过 Binder 驱动程序调用 ActivityThread 类中的 scheduleBindService 方法传递到 Service 所在进程中,并根据 Service 的状态不同而被调用对应方法(即 mConnection 通过 ServerManager 从 Client 传递到了 Service)。
在这其中我们用到了两个涉及到 AIDL 文件:
- private IBinder mIBinder = new AidlBinderInterface.Stub() {}
- mServiceInterface = AidlBinderInterface.Stub.asInterface(service);
再来看看我们写的对应的 AIDL 文件:
interface AidlBinderInterface {
 //在这里定义服务需要提供的方法
}
在这个文件中都是我们自己定义的方法,系统自动帮我们实现了更详细的内容:
package com.example.aidl;
// Declare any non-default types here with import statements
public interface AidlBinderInterface extends android.os.IInterface {
/**
* Local-side IPC implementation stub class.
*/
public static abstract class Stub extends android.os.Binder implements com.example.aidl.AidlBinderInterface {
private static final java.lang.String DESCRIPTOR = "com.example.aidl.AidlBinderInterface";
/**
* Construct the stub at attach it to the interface.
* 将 DESCRIPTOR 和这个接口绑定到一起
* 本方法会在服务创建 IBinder 对象的时候调用
*/
public Stub() {
this.attachInterface(this, DESCRIPTOR);
}
/**
* Cast an IBinder object into an com.example.aidl.AidlBinderInterface interface,
* generating a proxy if needed.
*/
public static com.example.aidl.AidlBinderInterface asInterface(android.os.IBinder obj) {
if ((obj == null)) {
return null;
}
// 查询本地是否有符合该描述(DESCRIPTOR)接口的 Binder 对象
android.os.IInterface iin = obj.queryLocalInterface(DESCRIPTOR);
// 有的话直接返回本地对象
if (((iin != null) && (iin instanceof com.example.aidl.AidlBinderInterface))) {
return ((com.example.aidl.AidlBinderInterface) iin);
}
// 没有的话,创建代理类,进行跨进程通信
return new com.example.aidl.AidlBinderInterface.Stub.Proxy(obj);
}
@Override
public android.os.IBinder asBinder() {
return this;
}
// 在通信时,如果 asInterface 返回本地对象,则会执行本地对接口(DESCRIPTOR)的实现方法,
// 否则就会调用代理类 com.example.aidl.AidlBinderInterface.Stub.Proxy 中对应的方法进行跨进程通信
@Override
public boolean onTransact(int code, android.os.Parcel data, android.os.Parcel reply, int flags) throws android.os.RemoteException {
java.lang.String descriptor = DESCRIPTOR;
switch (code) {
case INTERFACE_TRANSACTION: {
reply.writeString(descriptor);
return true;
}
case TRANSACTION_getAvailablePointTags: {
data.enforceInterface(descriptor);
java.util.List<String> _result = this.getAllStringTags();
reply.writeNoException();
reply.writeTypedList(_result);
return true;
}
...
default: {
return super.onTransact(code, data, reply, flags);
}
}
}
/**
* 代理类
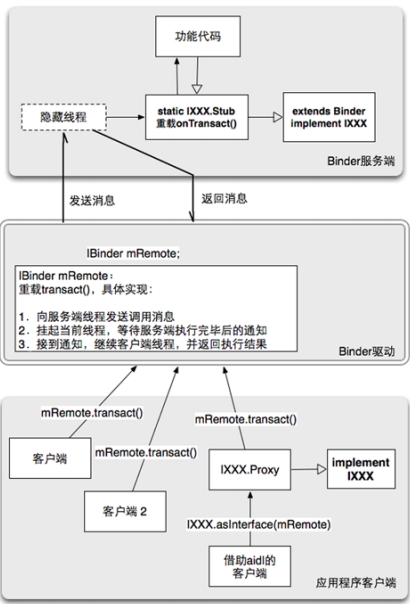
* 通过 Binder 对象 mRemote 执行 AidlBinderInterface 接口的具体方法
* 具体则在 mRemote.transact() 实现了跨进程
*/
private static class Proxy implements com.example.aidl.AidlBinderInterface {
private android.os.IBinder mRemote;
Proxy(android.os.IBinder remote) {
mRemote = remote;
}
@Override
public android.os.IBinder asBinder() {
return mRemote;
}
public java.lang.String getInterfaceDescriptor() {
return DESCRIPTOR;
}
//系统对我们在 AIDL 中定义的方法的具体实现
@Override
public java.util.List<StringTag> getAllStringTags() throws android.os.RemoteException {
android.os.Parcel _data = android.os.Parcel.obtain();
android.os.Parcel _reply = android.os.Parcel.obtain();
java.util.List<StringTags> _result;
try {
_data.writeInterfaceToken(DESCRIPTOR);
// mRemote.transact() 方法会:1.给服务端发消息 2.挂起当前线程 3.收到服务端返回后唤醒当前线程
mRemote.transact(Stub.TRANSACTION_getAllStringTags, _data, _reply, 0);
_reply.readException();
_result = _reply.createTypedArrayList(StringTag.CREATOR);
} finally {
_reply.recycle();
_data.recycle();
}
return _result;
}
//系统对每个接口方法的编号
static final int TRANSACTION_getAllStringTags = (android.os.IBinder.FIRST_CALL_TRANSACTION + 0);
}
//下面这些是系统根据我们在 aidl 中定义的方法写的接口
public java.util.List<StringTag> getAllStringTags() throws android.os.RemoteException {}
}
可知mRemote便是指向 AMS 服务的BinderProxy对象 https://www.diycode.cc/topics/384
https://www.cnblogs.com/a284628487/p/3187320.html
others
如果在 BroadcastReceiver 的 onReceive 方法中创建一个线程,那么当该方法返回时,Android 系统就会认为该 BroadcastReceiver 已经完成任务了,从而会在需要回收内存时杀死进程以及其中的 Thread。创建一个JobService可以避免这个情况。
So, the system may kill the process at any time to reclaim memory, and in doing so, it terminates the spawned thread running in the process.
https://developer.android.google.cn/guide/components/activities/process-lifecycle?hl=zh-cn
https://blog.csdn.net/universus/article/details/6211589
https://www.jianshu.com/p/429a1ff3560c
https://www.cnblogs.com/a284628487/p/3187320.html
有想法?欢迎通过邮件讨论。